Monday, May 20, 2013

Playing Catch-up

We've had two recent girl birthday parties that either one or all of us were invited to.  I thought that girly PJ eaters were in order for both occasions, and so I cut out two nearly identical ones.  (The zipper color was the only difference.)  I'm really pleased with this one and think it's one of the cutest I've made so far!  (And I'm amused that for the birthday party which we attended as a family, I finished the PJ eater in the car - stuffing and stitching shut.  Yep, procrastination pays....)  I'm definitely keeping track of who gets PJ eaters now - this are great birthday gifts, but I've got to make sure I don't accidentally give two to the same kid!


And Thing 2 was in love with the dinosaur appliques I made as a baby gift, so I had to make him his own dinosaur appliqued shirt - with more boyish colors, of course! :)  He loves orange, so I thought this batik-like print was perfect for him.  I enlarged the dino drawing until it looked vaguely appropriate (nothing scientific - just eyeballing), then traced it onto Heat-n-Bond Lite and fused it in place.  This is another which has been stitched on with straight-stitching around the edges, and I don't remember putting any Fray-Check on it.  But I've had to wash it four or five times by now, and so far, no fraying is noticeable.  This has already become a favorite!  I can see that I'll have to watch for other fun applique designs!


Friday, May 17, 2013

Teacher birthday/appreciation gift

We have really appreciated Thing 1's teacher this year, so I wanted to give her something for her birthday that would be useful but fun.  Teachers can always use tote bags for their stuff, so I thought that would be a good idea.  And I already knew (from Thing 1) that she loves pink and shoes, among other things.  When I saw the high heels fabric on the Nancy's Notions website, it was a no-brainer!  I used a pink duck cloth from JAF as the outer fabric.

I ordered 1.5 yards, because I didn't figure out exactly what I was going to do before ordering.  Later, I saw the Green Pepper Wave Bag pattern at JAF and bought it, thinking that might be the way to go. However, after mostly finishing the prototype (it's still languishing while I re-evaluate how I want to do the upper trim/handles), I decided that it wasn't going to be what I wanted for the teacher, and I went with a simple and basic tote bag design.  

I measured a good-sized tote bag we had on hand and approximated those measurements for my bag.  That one had an almost full-size pocket on the outside, which I considered using here.  In the end, I couldn't figure out how to do the handles and the upper trim the way I wanted if I put the large pocket on the outside, so instead I added it to the inside.  I did put a small pocket on the outside, sandwiched between the handles.  To make the trim on the upper edge of that pocket, I stitched the outer and lining fabrics RST, then wrapped the lining fabric to the inside - OVER the seam allowance.  This gave me a half inch (IIRC) trim at the upper edge of the pocket.  For the trim at the top of the bag, I cut the lining 1.5 inches taller than the outer fabric, then folded and pressed the lining 0.5 inches under (to hide raw edges), then another 1 inch under.  When I set the lining inside the bag, I tucked the outer fabric into that last fold, pinned it in place, and stitched it down.  I'm really happy with how this turned out.  You can also see that the lining is peeking out on the underside of the handles.  That was the suggestion of a neighbor!  The handles are tubes of duck cloth, pressed flat and edge-stitched on both sides.  I made single-fold "bias" tape to cover the underside of the handles, just for the parts that show (and extending an inch or two past, just in case).

This shows the inside.  If you look at the bottom, you can see a "bellows" pocket to the left (which I'm not entirely happy with - I think I made it a bit big) and a small flat pocket to the right.  You can also see the edge of the large pocket at the top left - that was made from one layer each of lining fabric and duck cloth.  I was thinking that it would be good for separating out papers or something.


I really like how this bag turned out, and I'm going to use the same idea again - hopefully soon for our long-intended library books.  I hope that the teacher really liked it.

Tuesday, May 14, 2013

Easy drawstring bags

I've been working on some easy drawstring bags lately.  I've done large versions of these before, with vinyl windows, as a way to contain toys.  These were the same idea, but without the window, making them pretty quick and simple.

This was inspired by Thing 1's invitation to a birthday party involving a Pokemon tournament.  I thought it would be good for him to have a pouch of sorts to hold his cards, so that he didn't have to take them in a ziploc bag.  I had Pokemon fabric leftover from his lunch bag, so I pulled it out and used it to make a simple bag.  (IIRC, I cut the pieces 9 inches tall by 7 inches wide.)  This is lined with white muslin or broadcloth - I don't remember which I had on hand - and then a casing was made from extra wide, double fold bias tape (unfolded), and a drawstring from single-fold bias tape (folded in half and stitched).  This works great as long as the kid doesn't have a huge collection of cards.  (Full disclosure - this had plenty of room until Thing 1 came home from the party with double the number of cards he had taken.  So now I've made him another one (no picture yet) with boxed corners and plenty more room!)  This is actually the second one I made - as a gift for one of Thing 2's friends.  The casing/drawstring color was customized to the child's favorites.  Add a pack or two of cards, and your gift is done!


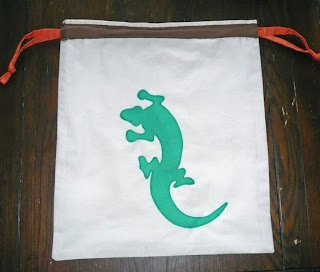
For the Pokemon party Thing 1 was invited to, the birthday boy requested no gifts for himself - instead he wanted donations for the Boy Scouts' April Showers campaign.  I thought that was really neat, but I also wanted him to have something he could keep.  However, I wanted to honor the request and so make his "keepable part" very simple and useful.  I thought that a simple drawstring bag would serve as the gift bag and then be kept for whatever he wanted to store in it.  And since this child LOVES animals - especially snakes and lizards - I thought that some simple appliques would make it more fun.  I went to Google Images and found some coloring pictures of lizards and geckos and those two that I thought would be easy enough to applique.  A little Heat-n-Bond Lite and some straight-stitching around the edges, and voila!


I'm going to remember this for the future - muslin or thrifted sheets for the bag, to keep it low-cost and lightweight, and a simple applique or two to snazz it up a bit.  For this one, I think I had made my own bias tape for the casing, but used premade for the drawstring.  Oh, and when I make single-fold tape for the casing or double-fold tape for the drawstring, I often cut it on the straight grain, because it doesn't need that bias stretch.  Just whatever is quicker/easier.