Showing posts with label drawstring bag. Show all posts

Saturday, January 27, 2018

Another drawstring backpack

So....yet another drawstring backpack.  I have a friend who had seen one that I made (but apparently didn't blog!) and was astounded to learn that I'd made it, and immediately expressed interest in commissioning one.  Well, I remained noncommittal as to the commission, but I did make a mental note to make her one at some point.  This was supposed to be part of her baby shower gift (as in, part that was for HER), but I didn't have time to sew it up before the shower.  And so there the pieces sat for a long time.  But I'm hoping to see her soon, so it was time to finally finish this.

The outside is your basic black twill, which is kind of my go to.  (I don't know why my camera was acting up and having fuzzy edges, either.)  I used a purple zipper for some interest.  And the straps are the last of my black paracord from Lowe's....need to get some more of that.

Purple zipper with the lining of the front pocket peeking through.  I did like I've done on all of them - made the front pocket a full one, and lined it with the lining fabric.


And then I added a full inner pocket, which was lined with the lining fabric, as well.  And there I used a plum colored zipper, that almost perfectly matched a color in the sugar skulls.  I would rather have used a blue inside, but I didn't have one that matched any of the blues in the print.  And I didn't want to use black, because I wanted the zipper to stand out for ease of finding it.


She likes sugar skulls, so I thought this print was perfect when I spotted it.  Hopefully she'll love the bag!

Friday, November 10, 2017

Drawstring backpack to order

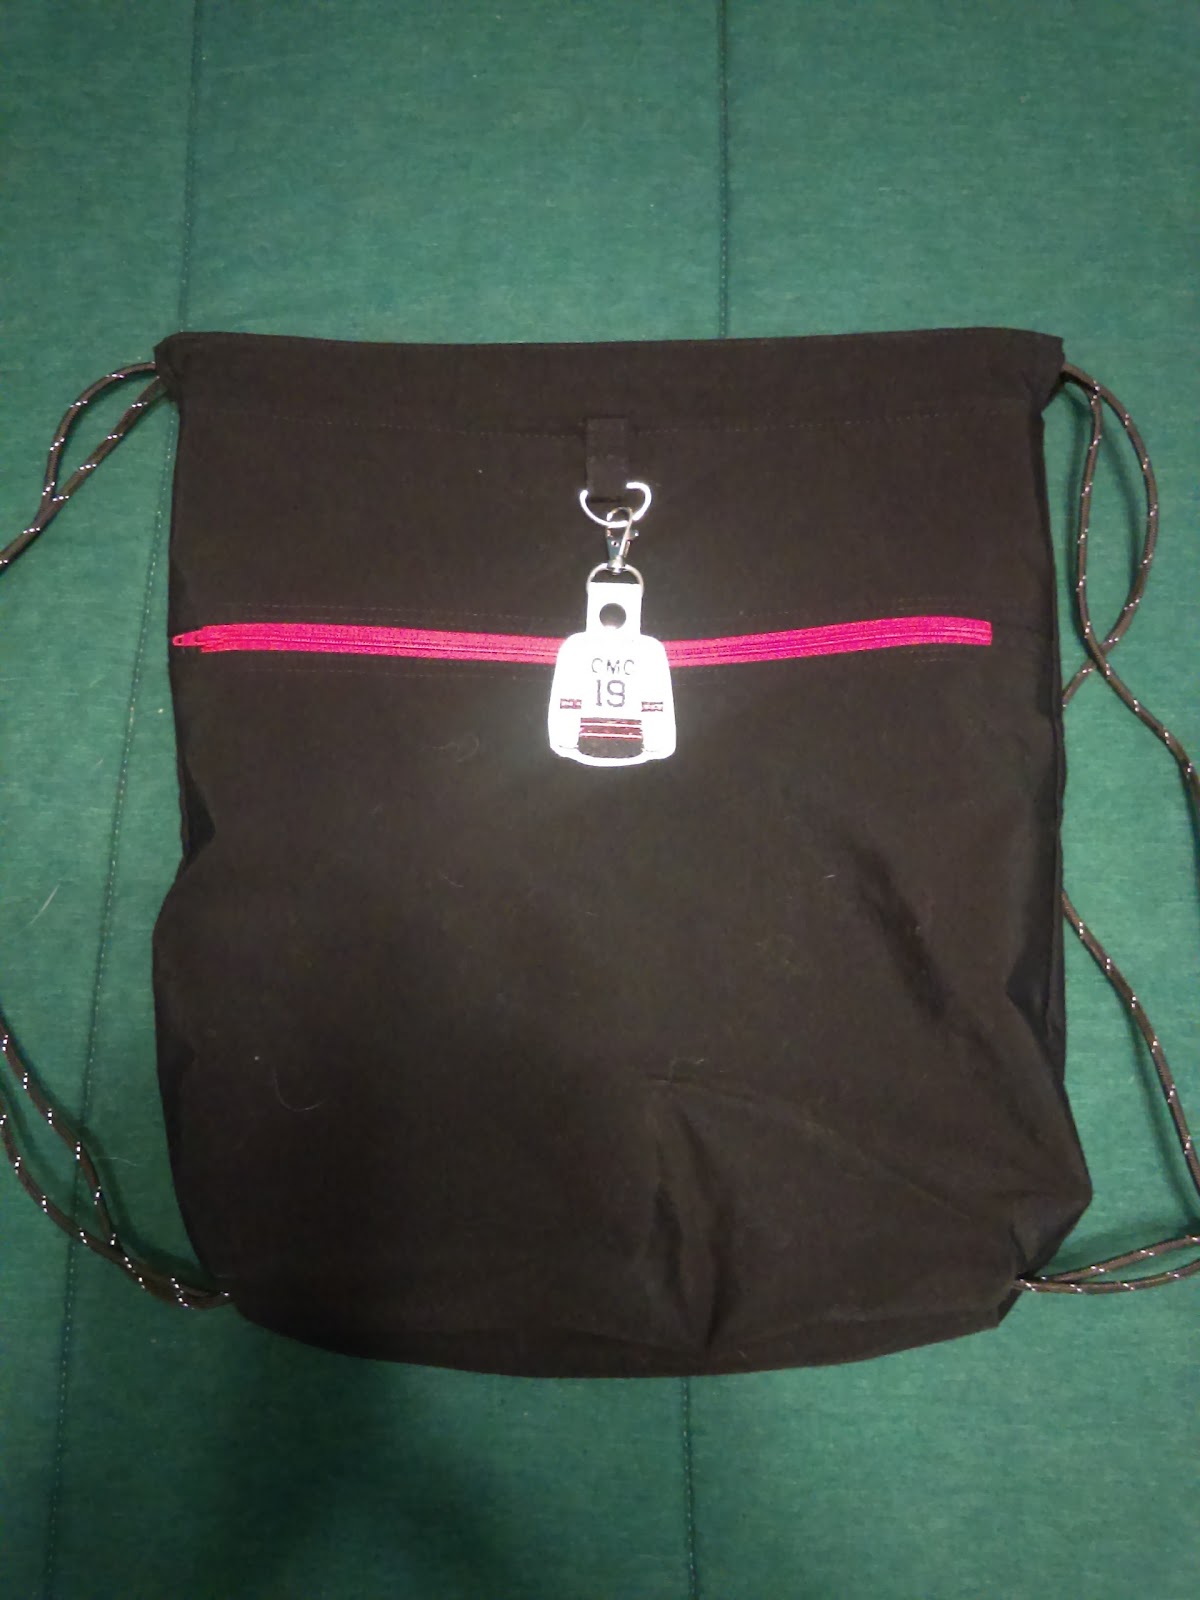
Thing 2 has eyed Thing 1's drawstring backpack for awhile, and I'd been promising him one.  And I finally followed through near the end of summer.  Unlike Thing 1's, which was a surprise, I let Thing 2 help design his.  He wanted one like my Chicago Blackhawks version, but bigger like his brother's.  No problem!

Outer is black twill like mine, but he chose a red zipper.  Good choice!  And like mine, there's a full pocket on this side but not the other.  


I added the D-ring again, and he got his own jersey key fob, made by my friend Sheila, who does amazing work as well as custom orders.  Also, this year he needed his own house key, so he got to pick out the ribbon he wanted on his key fob.  He loves going to Subway, so I wasn't surprised that he picked out the Zombie Subway ribbon.


Chicago Blackhawks block print for the lining of the outer pocket.....


....as well as for the lining.  And this time I actually lined up that print for a full inner pocket.  Look at that pattern matching!  I'm still tickled by it!  I think I used black for the backing of that pocket.  I should probably look, because I don't remember.


And then I used some of the heavier black cording I got from Home Depot.  It's been holding up pretty well.  Thing 2 has used this bag pretty much non-stop for the last three months now!  He's asked that the next one be camo for his "military" adventures with his friends.

Wednesday, November 2, 2016

Another drawstring backpack!

So I said last time that I'd make this pattern again, and I did!  Thing 1 was going on a school field trip, and they were allowed to take their electronics, as well as a change of clothes.  But he wasn't taking his backpack, which made me go, hmmm???  So I figured he'd like a smaller backpack for carrying his stuff.  (Because even if *he* wasn't concerned - yet! - about misplaced game cartridges, etc., I was concerned!)

Since I didn't have to worry about arena requirements this time, I made the size Medium (the largest size in the pattern).  I dug this green twill out of the dim recesses of stash....I only had scraps left, which dictated putting a pocket onto both the front and the back, since I didn't have enough to cut a full back piece.  I figured if nothing else, he could stick a notebook in the back pocket.

I didn't have any matching green zippers, so I used black, then tied that in with the cords and the strap for the D-ring.  This time, I used thicker paracord that I found at Home Depot - both cheaper and more sturdy than the cord I'd gotten from JAF!  I got several colors, so I plan to have fun with this.

And I remembered to put the zipper in the opposite direction.  I don't think that Thing 1 will notice or care, but it's something I added to the notes I made on the pattern.


The lining is a Pokemon print I bought to make a lunch bag.  Seeing as that never happened, I thought the drawstring bag was more important.  I used a blue zipper on the inside pocket, just for fun.


This size is right about the same as my current (not sewn) drawstring backpack, so I think it's what I'll make for my next project bag.  I like these bags for storing crochet projects, because they're so easy to grab and go with.  And great for stashbusting and using small pieces of prints that I love but just can't see what to use them with!  I can totally see myself having multiple sewn drawstring bags....I'm sure it won't take long.

Oh, yeah - and my son loved the surprise of his drawstring backpack!

Wednesday, October 26, 2016

Drawstring Backpacks

So I'm way into hockey - specifically Chicago Blackhawks - and I was going to a preseason game with Thing 2 recently.  I'm also very much into taking portable crochet projects wherever I'm going, because I don't sit still well.  I don't crochet *during* the game if I'm there, but on the train?  Sure!  And possibly during the intermissions....anyway, the arena had listed specific rules as to the maximum sizing of allowed bags, and my current drawstring backpack exceed the size limits.  Since I don't know how picky the arena would be on enforcing said rules, I didn't want to take chances.

In theory I could have made my own pattern for the drawstring bag, but I was having too much indecision regarding options, which wasn't helpful with my deadline.  I saw Green Pepper's String Bag pattern at JAF and decided to start with that.  Based on the finished measurements, I went with the size Small to fit the arena requirements.  And I wanted to go with the Blackhawks colors, so I bought a black rodeo twill from JAF. 

I made some changes.  The pattern is cut on the fold lengthwise, but my lining is directional.  So I cut front/back outer/lining not on the fold.  I also changed the pocket to be full front, rather than a standalone that was stitched onto the front.  To do that, I stitched the front pieces and zipper together, cut a lining piece the same size, and basted the front to the lining, then treated them as one.

And I have embroidered key fobs from a friend's Etsy shop (Babymoon) that I like to hang on my bags, so I added a D-ring to the center front to display my coordinating key fob. I like this and will do it on future bags!  (Got the idea from my zoo backpack - no idea what it was for, but it works for my purpose!)

The only thing I don't like is that I put the zipper the same direction as the pattern - pull from the bag's right side - and I would rather have it on the left, like the backpack I've been using for months.  Have to fix that on the next iteration....


Here you can see the D-ring more closely, as well as that lining peeking out.  This is official NHL fabric from JAF.  I've used it for hanging towels previously, and I think I'd bought this for a scrub shirt.  But it's not my favorite of the three I got for scrub shirts, so I sacrificed some for a bag lining.  (I think I also have boxers cut out for Thing 2, but I digress....)

You can also see the cording used for straps/closure.  I used a red cording that I found in the trim section at JAF.  It's a little thin for this, but it did work and was all I could find quickly.  I'd like thicker cords for the next ones, but this works.


And then the lining.  I added an inner pocket - I wanted a secure spot for whatever miscellaneous (keys, phone, cash, crochet hook, etc.).  I knew it would drive me nuts to try to line up that block print, and I wasn't sure I had enough left to match it.  Instead, I just put a solid black pocket inside.  It has the added benefit of being more obvious against the bright print.


 All in all, I like the end result!  It's a little smaller than my other backpack, which was of course the point.  I can easily carry two skeins of yarn inside, but any more would feel overstuffed.  It definitely worked well for my purposes, and I will continue to use it when I go to hockey games or am okay with a smaller bag.  I will say that between the smaller size and the zipper being the wrong direction for my reflexes, it probably won't be my favorite project bag.  But it works, and I will enjoy using it.  I will also take what I learned from this bag and make more!

Tuesday, August 20, 2013

Party gift bags

So my monkeys have summer birthdays, and we have pool parties for said birthdays.  After all, why pay for a fancy party venue, when there's a pool in the backyard, right?  Anyway, as I blogged about last year, I prefer to have "green" party bags.  So this year I thought that drawstring bags would be good, and I wanted to make them a little more "themed" to the pool, especially since the goodies inside were all pool-related.  So I found a swimming clip art image and enlarged it to a good size for the bags.  I used heat-n-bond lite to fuse the appliques in place, then straight-stitched just inside the edges with matching thread.  The green bags were for Thing 1's party (his favorite color is green), and the orange ones for Thing 2's party.  The green and black fabrics were thrifted sheets - the green is actually more of a lime color - and the orange was broadcloth that I purchased on sale at JAF.  The green bags are lined with black, but the orange bags are lined with the orange.  The bags ended up measuring about 11 inches wide by 13.5 inches tall - a good size for fun pool toys, as well as whatever treasures they will hold later.


I hope that the kids enjoy using them to hold their stuff as much as I enjoyed making them!

Tuesday, May 14, 2013

Easy drawstring bags

I've been working on some easy drawstring bags lately.  I've done large versions of these before, with vinyl windows, as a way to contain toys.  These were the same idea, but without the window, making them pretty quick and simple.

This was inspired by Thing 1's invitation to a birthday party involving a Pokemon tournament.  I thought it would be good for him to have a pouch of sorts to hold his cards, so that he didn't have to take them in a ziploc bag.  I had Pokemon fabric leftover from his lunch bag, so I pulled it out and used it to make a simple bag.  (IIRC, I cut the pieces 9 inches tall by 7 inches wide.)  This is lined with white muslin or broadcloth - I don't remember which I had on hand - and then a casing was made from extra wide, double fold bias tape (unfolded), and a drawstring from single-fold bias tape (folded in half and stitched).  This works great as long as the kid doesn't have a huge collection of cards.  (Full disclosure - this had plenty of room until Thing 1 came home from the party with double the number of cards he had taken.  So now I've made him another one (no picture yet) with boxed corners and plenty more room!)  This is actually the second one I made - as a gift for one of Thing 2's friends.  The casing/drawstring color was customized to the child's favorites.  Add a pack or two of cards, and your gift is done!


For the Pokemon party Thing 1 was invited to, the birthday boy requested no gifts for himself - instead he wanted donations for the Boy Scouts' April Showers campaign.  I thought that was really neat, but I also wanted him to have something he could keep.  However, I wanted to honor the request and so make his "keepable part" very simple and useful.  I thought that a simple drawstring bag would serve as the gift bag and then be kept for whatever he wanted to store in it.  And since this child LOVES animals - especially snakes and lizards - I thought that some simple appliques would make it more fun.  I went to Google Images and found some coloring pictures of lizards and geckos and those two that I thought would be easy enough to applique.  A little Heat-n-Bond Lite and some straight-stitching around the edges, and voila!


I'm going to remember this for the future - muslin or thrifted sheets for the bag, to keep it low-cost and lightweight, and a simple applique or two to snazz it up a bit.  For this one, I think I had made my own bias tape for the casing, but used premade for the drawstring.  Oh, and when I make single-fold tape for the casing or double-fold tape for the drawstring, I often cut it on the straight grain, because it doesn't need that bias stretch.  Just whatever is quicker/easier.