Sunday, August 28, 2011

Baby gifts!

My brother and his wife are expecting a baby, so naturally I want to make baby gifts! I have a bunch of nursing pads cut out, but they're not terribly exciting to send pre-baby, so I had to work on other stuff first. I didn't send anything before now, because they were being very cautious with this pregnancy, but now that she's at twenty weeks, they're feeling better about it, so game on! The first item is the one that I've just sent, so hopefully they like it. When I cut out baby suit for my friend a few months ago, I had enough to also cut out a second jacket, and then I found enough leftovers from a previous project to make matching pants. This is from KS SFB, size M.
I've also been looking through my stash - because I'm trying to stash bust! - and I found two yards of a Winnie the Pooh cotton print and about a yard and a half of a Care Bears flannel print. I cut the Pooh print in half and used that and the Care Bears to make single layer blankets, just evening up the sides and then making narrow hems. These should be good for nursing cover-ups or for light blankets.

This piggy bank flannel print is one that my brother and his wife had given me for Christmas about six years ago, when I was pregnant with Thing 2. I finally used some of it to make myself PJ shorts (which I just realized never made it onto the blog - have to fix that soon) but still had enough for a baby blanket. I found a coordinating purple solid flannel for the other side and appliqued two piggies onto it, then bound the two flannels together with a sparkly purple nylon-lycra. I think it turned out really cute! (I thought the nylon-lycra would make a less bulky edge than my usual fleece binding, so it might be usable for swaddling.)


When I made the piggy banks and Care Bears blankets, it was before we knew that the baby would be a girl. I just thought that they'd be cute, and I could put them into my gift stash if the baby turned out to be a boy. But we just learned last week that she's a girl - my first niece! Woohoo!


Saturday, August 27, 2011

Back to school!

Despite my best-made plans, the new school outfits were not finished in time for the all-important first day of school. They were okay with that, however, and they wore other Mama-made clothing. I also didn't have them done in time for the second day of school - for shame! - but they were ready to celebrate the THIRD day of school (which really doesn't get enough love, so it was all good).

Thing 2 got a new button-front shirt identical to the one I made for Project First Day (B3475, size 5) and a pair of chocolate brown twill shorts (B3475, size 4). You can't see them in this picture, but the pocket flaps on the shorts are lined with remnants from the shirt. He was very excited to get his new outfit! The shirt has only been worn once so far, but the shorts have been worn several times. Thing 1 got a new Ooga Booga shirt (Fishsticks Designs Patrick Curved Raglan Seam shirt, size 7/8), this one in the Rainbow colorway. He loves the hooded shirt I made him earlier this summer in the red/black/grey colorway, so when he saw this fabric, he jumped on it! The shorts (B3475, size 6) are a blue denim, and the pocket flaps are lined with a green broadcloth. The shorts are a little long, so I'll probably shorten the next pair, but he says that he also likes this length. And while he has reworn the shorts several time, the shirt seems to be his first choice as soon as it comes out of the wash! Good thing I have more of this print as well as some of the other colorways! I foresee eventually making a long-sleeved shirt in this print, maybe with a green or blue solid instead of red.

And in other back to school news, my older son came home on the first day and told me that two students in his class had asked if I would make them backpacks, too! ;) I'll take that as a compliment.

Thursday, August 18, 2011

The backpack factory.....

It's back to school time, and Thing 1 needed a new backpack. His old Spiderman backpack was looking worse for wear, and the zipper has given up the ghost. (Though it will still be good enough for use as a library book bag, so I do plan to replace the zipper and give it a new lease on life.....)

Despite knowing this, he asked after church two weeks ago if he could bring his Spiderman backpack to church the following week. When asked why, he told us that the Sunday School classes were taking donations of backpacks and other school supplies to distribute to underprivileged kids. Um, no, remember there's a reason why you're getting a new backpack??? But hey, I decided that charity should be encouraged, so we told Things 1&2 that they could pick out other fabric for extra backpacks to donate, and I would make them in time for us to shop for school supplies to fill them, and bring them to church on the appointed day.

Thing 1 picked the fabric on the right, which I've been jealously hoarding for a few years now, just waiting for a project worthy enough for it. And Thing 2 picked the fabric on the left, of which I have TONS. (I bought the rest of the bolt when it was on clearance for $1/yd at WM a few years ago, intending to use it for toddler bedding and such. Yeah, this was the first time I used it.)
As usual for my backpacks, I used Butterick 6735, view A, with my usual changes. As per the previous backpacks, I quilted the outer fabric to a layer of batting and added a separate lining. As per the last one, I used webbing for the strap fastenings, though this time I simply used adjustors instead of actual parachute buckles (trying to save $$ - but I have to say that those worked really well!) This time, I also used webbing for the hanging loop. I think it will give more security. Time will tell....I found webbing that looked really nice with the bug fabric backpack but was forced to just use black with the Matchbox backpack. Because I have so much of the Matchbox fabric, I used it as the lining as well. But the bug fabric is much more limited, and I'm still in love with it, so I used a red cotton leftover from my stash to line that backpack. Another change that was made based on last year was to make the zippers non-separating - a little kid with a separating zipper seemed to be a recipe for a broken zipper....sigh....

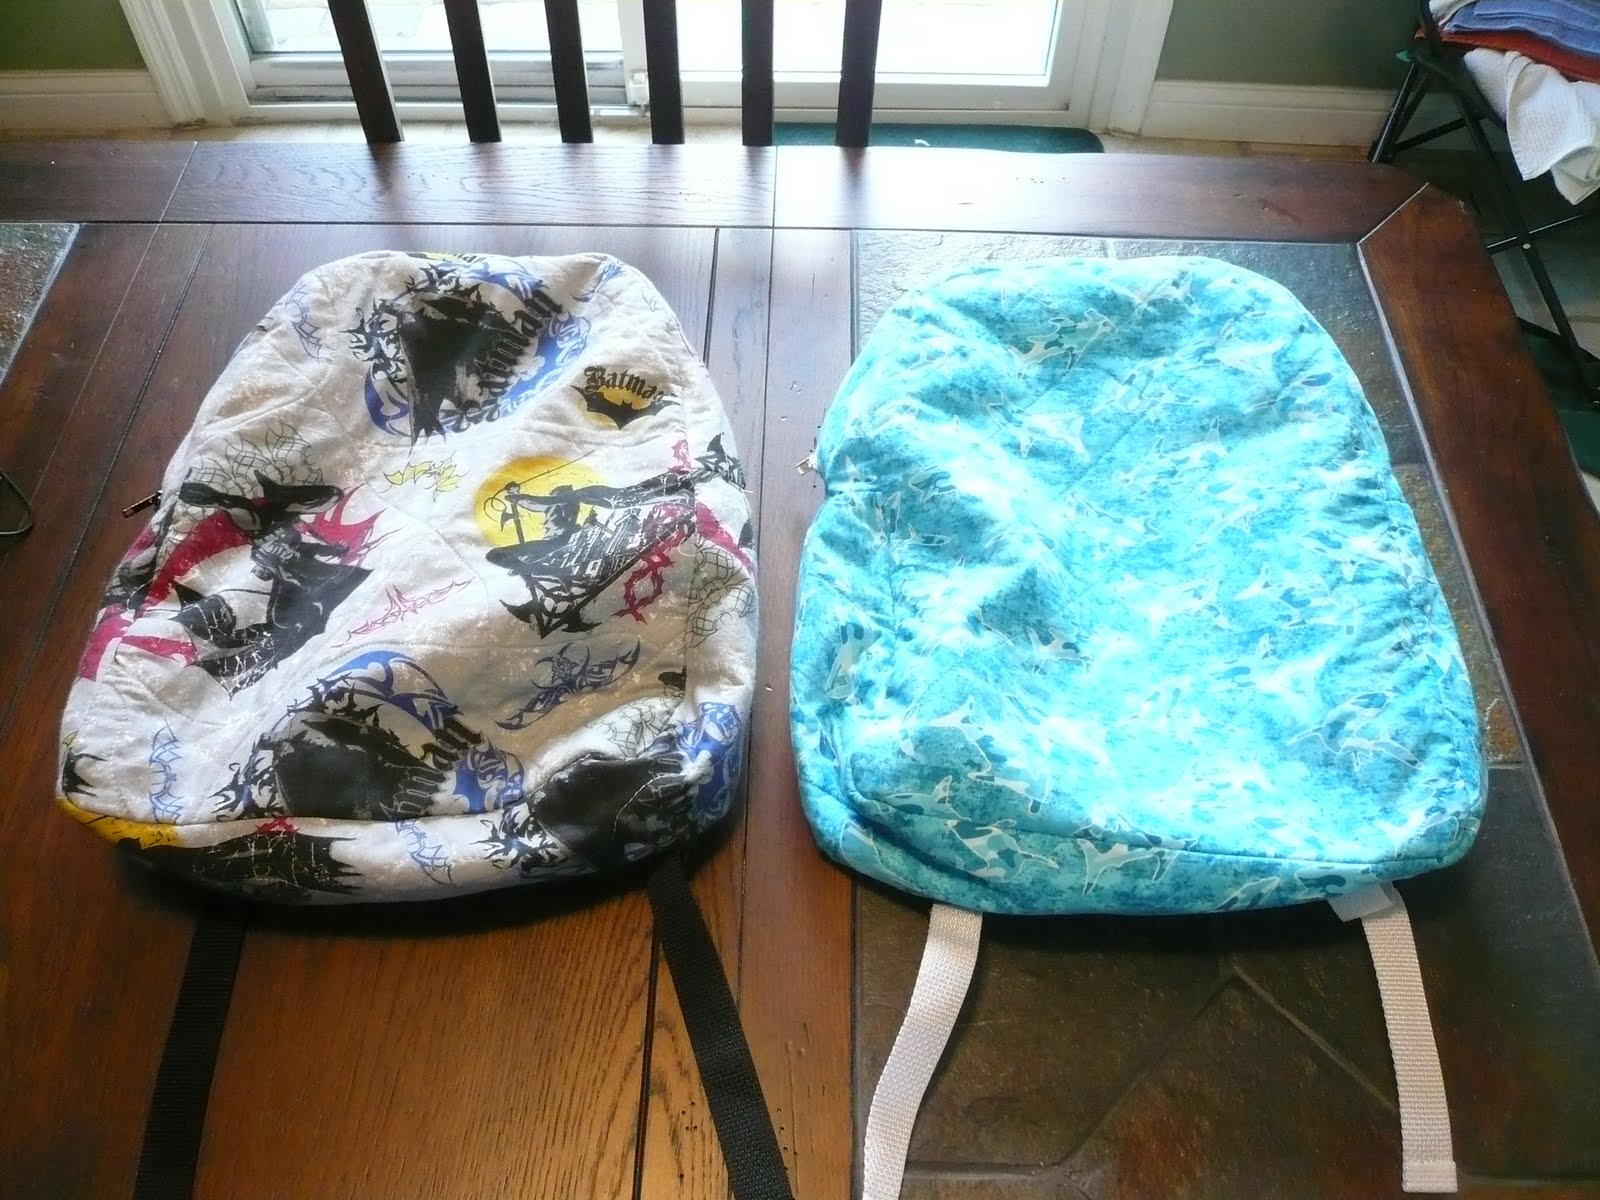
Once I finished the donation backpacks (Sunday morning before we left for church!), it was on to the backpacks for my little students. Thing 2 picked the Batman fabric on the left, and Thing 1 picked the shark camo fabric on the right. I made these the same way as the donations, except that I lined these in PUL - my first time trying this. We'll see how I like it. (I didn't have enough PUL leftover to line all four backpacks with it, and I was trying to only buy notions for my back-to-school sewing this year.)


Again, I used webbing and adjustors to make the straps, and I'm pretty happy with that. The Batman backpack has black webbing, and the shark has white. But I could only find the black adjustors, and I didn't start early enough to have time to order any. But that's okay! The boys are happy with their new backpacks.


And a closer look at the shark camo, which I really like. I have enough left for some shorts for at least one boy, I think....


Monday, August 8, 2011

Back-to-School charity sewing

Project First Day was started by Susan Stewart to help give the children of Joplin, MO, a sense of normalcy in the midst of the continued devastation from the tornadoes last Easter. She remembered that as a child, she always got a brand-new outfit for her first day of school, and she wanted that for these children, despite all the struggles their families may have just to survive. So she put out a request for sewers to make and donate brand-new outfits for school children, with a note attached to tell each child that someone was thinking especially of them while making this special outfit.

I thought about it and decided to contribute two outfits - similar in style/fabrics to what my own boys will be wearing for their first day of school. I even enlisted my boys to help pick fabrics. For the first, I used B3475, my go-to pattern for boys' button-front shirts. The shirt is a size 5, and the shorts are a shortened size 4. Both are perfect for my DS#2 while still giving a bit of growth room. I used all stash fabrics for this, only purchasing notions as needed.

Because I used stash, my boys will not have identical items, but theirs will be very similar. The shirt fabric is one that I purchased several years ago - it may have been from WM or JAF clearance aisle. I'm not sure anymore. But it has a nice feel to it, so even if it was inexpensive, it wasn't a cheap fabric. I had just enough to squeeeze out two shirts, much to my DS's delight! And I enlisted my DH's help on choosing button colors. For this one to donate, I sewed an extra button on the inside of the button facing, at the bottom of the shirt - a RTW touch! ;)

The olive green shorts are a cotton twill, I believe. Unfortunately, I didn't have enough for two pairs, so my DS#2 will have dark brown shorts. The pocket flap is lined with the leftovers of the shirt fabric to tie the outfit together.

This outfit uses B3475 for the shorts (size 6) and Fishsticks Designs Patrick Curved Raglan shirt (size M). I didn't think in time about shortening the shorts, so they will be long. More growth room, I suppose! The shorts are a black stretch denim that I purchased with the intent of maternity jeans - five years ago....I used the rest of it recently for long pants for my boys - which should still fit next year - and I think there's enough left for KS SFC shorts for DS#1, but not for these cargo shorts. I lined the pocket flaps with a red tonal cotton print. DS#1 will have blue denim for his cargo shorts.

The shirt front uses leftovers from a shirt DS#1 wears at least weekly. I only had enough length to cut out the front, so I decided to use a solid black for the back and neckband and a solid red for the sleeves. I was afraid that if I used black for the sleeves as well, it might look like I just ran out of fabric, instead of a design feature. ;) It seems to have worked - DH thought it was great, and DS#1 was drooling over it, despite already having a very similar shirt with that print! (He's now picked out an ooga interlock in a different colorway for his back-to-school shirt!)
Thanks to health issues and then sewing room makeover, I didn't get started on these nearly as early as I'd intended - oops! Oh, well - I stayed up late Friday night and got up early Saturday a week ago to get these done and to the post office in time to make the August 1st deadline. Whew! Still working on the versions for my boys now.....

Saturday, July 30, 2011

Playing catch-up.....

Hard to believe it's been 2 months since I last posted, but a lot has happened....

My sewing room is in the midst of a renovation! These are the wall colors. We picked the light green on the left, then after painting two walls, decided it needed an accent color. The darker green color was used in the kitchen and part of the living room by the previous owners, and they had left us some. So that went on one wall. Then we decided to get color-crazy and throw in something totally different on the remaining (large) wall - that's where the dark purple came in! (This is especially shocking to some of our friends, as we painted almost every room in our previous house in the months of renovation before we moved, and they were all some shade of white/offwhite/tan.) I have to say, it's different, but so far I'm loving it!
The idea is to make quilted wall hangings to tie the room together. I don't know exactly what they'll look like yet, but I'm looking at quilt blocks for sampler quilts. And I hit a sale on FQs at the LQS earlier in the month - these are from that sale:


Under the FQs is a white on white print that will become the sashing and borders, I think, and in the upper left is a seafoam-ish green that was an almost exact match to one of the green shades in the paint color cards. (I grabbed all the shades in each of the color "families" that contained the actual paint colors we used - took those to the LQS to help pick out fabrics. Worked great!) I'll use that green as the background in the blocks. I can't wait to get started! I think the first sampler will be a 2x3 arrangement of 18-inch blocks. Maybe....


Before the room was dismantled for painting and shelves, I managed to squeeze in just a little sewing. The boys need more summer PJs, not that they always wear them, and I had purchased the monster flannel on sale "just because." So I made each of them PJ shorts in the next size up, then added appliques to purchased T-shirts. Quick, easy, and effective.


There's been more since, but that's a good stopping point for now. :)

Wednesday, May 25, 2011

More cutoff jean shorts....

The lighter pair are the ones I made about a year or so ago. Despite being worn pretty constantly for a summer, they're still in good shape! But I need more, because I plan to pretty much live in shorts this summer. (We've already hit 90 more than once - yikes!) So I made a trip to a local Goodwill and bought four pairs of jeans for $4 each, solely for the purpose of creating cutoffs. The jeans I found were darker, so I went in search of a swimsuit print that would coordinate better. Yeah, no luck there, but I bought this navy with white geometric print. I think it looks okay!

I hadn't found last year's pair yet when I made the first ones this week. I made them long, about knee length, and then wore them for a day or two to see what I thought. Hmmm....too long, I think. I'm going to whack off two inches or so and rebind them. I then made the second pair after finding last year's, and I've been wearing them nonstop for a few days. I like this length much better.
Tomorrow I'll work on fixing the first pair. I want to find the rest of the grey/white rose print I used in last year's so that I can make the third pair in that. And then I think I'll pick up a red solid over the weekend and use that for the final pair. Just to change it up a bit. I asked a friend if she thought that would look weird, but only about half an inch is visible at the bound edge, so she thought it would be fine.
Because these are a bit big on me (and I'm hoping that before the summer ends, they'll be a LOT big on me), I have to wear a belt with them. I'm using the webbing/ribbon one I made last year, but it's time to make another. This time, I might use a buckle instead of D-rings....we'll see....

Tuesday, May 17, 2011

Patching jeans....

So I have this friend who has done I don't know what to her jeans and needed repairs made, as she is broke and doesn't want to buy new ones, especially since she's losing weight.This is not the pair that is pictured with completed repairs, but this pair is fairly representative of the holes in her jeans.
This shows the inside of the jeans. I put these patches on in two pieces so that I could butt each patch up against the crotch seam. I'm pretty happy with them. These patches were made from Sew Classics lightweight denim from JAF (leftover from the dog crate) and Heat & Bond Lite. I think that these patches will work better than the ones I did with denim recycled from the legs of jeans that became cutoffs. That denim is a bit thicker - good for a single patch, but not for a double.
And this is the outside - not terribly noticeable! Unless someone is standing WAY too close to her, they shouldn't even notice. I did the V-shaped lines just to keep the two patches together, in case any of the adhesive ever wears out in the wash.
And I had to patch the hole where the button was and replace it. I used two patches again, then poked a hole with the seam ripper and installed the jeans button. First time!