Saturday, December 28, 2013

New blankets!

 As previously mentioned, my double-layer fleece blankets are popular, whether around this house or as gifts.  And sometimes both!  (As an aside, now that I look at previous posts, I see that I haven't made any new fleece blankets for my house since 3 years ago!  All of those are holding up very well and in heavy rotation, so that's a good thing.)

Thing 2 loves Angry Birds, so when I was walking through HF last month and spotted this fabric, I immediately thought of making him a blanket!  Of course, I'm also frugal, so I had to think on it for a few days and crunch the sale price before I went back to get it.  But in the end, it was under $7.50/yd, so who could pass that up?!?  This one is backed with a solid black (on a great sale at JAF - $2.99/yd) and then bound with the red fleece that I already had on hand, wound onto a "wheel."


And of course, if one gets a new blanket, the other will want a new one!  So I started looking for a good fleece print for Thing  1.  I really liked this Agent P fleece that I found, and I knew that he would, as well.  It is backed with a solid blue in the same shade as the background (also at that great JAF sale), and bound with black fleece that I already had prepared for binding.  I think it turned out great!


My boys were thrilled with their new blankets and immediately wanted to put them on their beds.  :)  And I have two more blankets that I want to make for general house use - the prints are both from long-time stash, though I did buy the backings at the big JAF sale.  Hopefully I'll be able to blog about them soon.

Wednesday, December 18, 2013

Another set of pillowcases

As previously shown, I love making pillowcases as gifts.  They're quick, easy, practical, and fun.  Even if someone's decor doesn't lend itself to fun spurts of color, a pillowcase reflecting their favorite colors or interests is usually welcome.

I found this winter print while searching my stash for something else.  It has snowmen talking about quilts, so it's more winter than just Christmas.  My grandmother used to quilt a lot - not sure if she still does - so I thought she'd enjoy this.  I have no idea how long I've had this or why I bought it, but it's got to be at least four or five years ago.  The green contrast was a cotton I purchased a few years ago with the intent to make it into a shirt for my husband, but he didn't like the feel, so there it sat.  And then I added red piping for interest - mainly because I had some on hand and didn't want to have to go out to get anything else for a contrast - and I got to use my new piping foot for the first time!  I like the way this turned out, and hopefully my grandma will love it.


Monday, December 16, 2013

Key fobs

So last year, I made a bunch of key fobs as gifts for teachers and friends.  It was the first time I'd ever done that, and they seemed to go over pretty well.  So I figured that I'd make more this year, especially since now I have a fair number of coworkers.


I made more than what is pictured, but these are all the unique combinations of print/color.  This time, all the supplies were purchased through a single online coop, run through FaceBook.  All key fobs are made with poly webbing and ribbon.  I still like how the fabric ones looked last year, but I think that these are easier and quicker but look just as nice.

I purchased 15 yards of the pawprint ribbon (middle to upper right), so that the roll could be ordered.  (The coop requires a certain number of yards to be ordered/paid for, or that print will be dropped.)   I've only used approximately 5 yards so far, so there's plenty remaining for future years.  I hope everyone likes these!

Saturday, December 14, 2013

Some stockings....

Remember my awesome tree skirt, 6 years in the making?  Well, each pre-quilted panel came with two pre-quilted stocking pieces.  And when you use 4 panels to make two tree skirts, you end up with enough for 4 stockings.  I've been ignoring these stocking pieces for years, because as gorgeous as I think the print is, I just didn't need them.  (I made us our own awesome stockings two years ago!)  However, I'm trying to be mindful of not wasting things, and sewing down my stash, etc.....so I decided that I would go ahead and make up these stockings, and then I could find recipients to fit them.  

I used my Three Kings cotton print as lining, just because I could. ;)  And I used different bias tape to trim the tops, so they can be easily distinguished.  The blue, skinnier bias tape is the commercial stuff I used on my aunt's tree skirt.  The navy is actually made from the Three Kings print - I had thought about using it on my tree skirt, but decided against it.  And the gold swirls is left over from my tree skirt.  My aunt is getting one of the gold swirls, even though it won't exactly match her tree skirt.  I just think it's super cool-looking.  I'm glad I finished these.


Thursday, December 12, 2013

Some applique!

My church adopted two needy families for Christmas this year.  We grabbed three wishes to fulfill, and one was for a shirt/blouse for a toddler girl in a 2T size.  I got a plain black T-shirt and a purple waffle-knit henley, and I thought it would be fun to add a winter applique to the black shirt.  The applique design is from etsykim.  While I was at it, I pulled out the purple T-shirt that I'd previously bought for my niece - because if you're making one, you might as well make two, right?


I think that they turned out really cute, and I hope that both little girls love them!

Tuesday, December 10, 2013

New boxers....and a thought....

Years and years ago (eight, I think), I made my husband a pair of boxers from a blue fabric with red chili peppers all over it.  He really liked them!  Sadly, time marches on, and those boxers desperately needed to be retired.  So when I saw this fabric in the thrift store, I jumped at it!  These became his birthday gift, though a little late....oops!  I didn't make any changes - this is my TNT pattern for him.  But I do really like how they turned out.


And the thought is that I've seen patterns for quilted wallhangings that are designed to look like boxers in the blocks.  I think it would be fun to make one, using pieces of retired boxers to make the boxers in the blocks!  I'm currently thinking about this one, which is for sale, or the free Laundry Time pattern.  It won't get anytime soon, anyway, so for now I'll just think about it, and hang onto the "retired" boxers.

Sunday, December 8, 2013

A Birthday Gift

I had made a pair of PJs for my BFF two years ago, and she loved them!  She sews as well, but apparently she wasn't doing a very good job of prioritizing any sewing for herself. ;)  So she requested a new pair of PJs.  I had a queen-sized flannel sheet from the thrift store that I thought she'd love (the print), so I used that for the pants and the front/back of the shirt.  There wasn't quite enough for the sleeves, so I used a coordinating navy flannel instead, and also used it for the neckband, which I brought to the outside again.  

I used M3006 for the pants and M5504 for the shirt.  Unfortunately, my notes were a little vague from when I made the pants the last time, and so they are a few inches short.  But I will add cuffs to them when she sends them back, and that will lengthen them correctly.  Fortunately, I have quite a bit of stash fabric for the pair I'm making her for Christmas, so I can cut a new, properly lengthened pair of pants and use the ones I already cut for someone else.


Friday, December 6, 2013

Back to sewing....(and why it's been so sparse)

So it's been quite awhile since I blogged, and I thought I should share why!  We lost our older dog Zoe over the summer, and it took awhile before we were ready to think about looking for a new dog to share our life.  Well, this little guy came and found us, right after we went to the wedding in October.  So he's been taking up a lot of our time and attention.  But I did manage to sew up a dinosaur costume for Halloween. :)  I've never been one to really dress up my animals, but I did think it'd be funny to have him wearing a costume, especially since he went out trick-or-treating with us.

This is Cooper at about 3.5 months.  


Thursday, October 10, 2013

A surprise request!

As previously mentioned, we are attending a wedding!  So while in the car the other day, I asked both Things what they might want to wear to said wedding, thinking that I wanted to make sure that their choices were clean.  (Not to mention getting any necessary vetoing out of the way early....)  Thing 1 wanted to wear a T-shirt and shorts - um, no.  But Thing 2 surprised me by saying thoughtfully, "I think a shirt and tie."

Whoa!  Where did that come from?  Good thing we were stopped at a stop sign, or I might have caused an accident!  "Um, Thing 2, you don't have any ties!"

"But we can get one, right?"

Well, sure, I guess....or I can make one....I vaguely remembered seeing a tie tutorial on the Fishsticks Designs blog.  So I looked it up and printed out the pattern.  Once we went through his button-up shirts and determined which one he would wear, I remembered this fabric, which I thought he'd love!  Frogs and lizards - what better?  He pronounced that more than acceptable, so I whipped up a "traditional" tie along with the velcro/neckband tie.  I think he'll prefer the velcro/neckband, but my DH was weirding out about it, so I just made both.  We can choose when we're getting ready, I suppose.

The pattern is very straightforward and easy to do.  I kind of expect to see more of these in my future, now that he knows I can make them. ;)  And I will be happy to do so!

Monday, October 7, 2013

Pillowcases!

I love making pillowcases as gifts.  Not only are they (usually!) fast and easy, but they are fun, practical, and easily customizable to the recipient's tastes and interests.  I decided to make Thing 2 a new pillowcase to celebrate his new room, using cheerful bug fabric I found on clearance at JAF.  (The red trim is a lightweight cotton from my stash.)  I decided to change things up by using piping instead of flat contrast trim.  I think it turned out pretty well!


And the real reason for making Thing 2 a pillowcase using piping was....to practice for these!  A friend is getting married this weekend, and while she and her new husband have indicated that they don't need anything, I know that she would enjoy some funky pillowcases.  Both bride and groom practice martial arts - that is how they met! - so I thought the Robert Kaufman I Am Ninja line would be perfect!  So here is a "his and hers" set of ninja pillowcases.  I'm really pleased with how these turned out.  (Which is good, as these are the most expensive pillowcases I've ever made, bar none!)


Thursday, October 3, 2013

A long time in the making....

So a few years ago, I decided  to make M5714 for my aunt's birthday.  I thought she'd like the view shown on the model on the front cover (view E), but I didn't want to make it in fleece.  I was envisioning this as being more of a light jacket to wear in the office, when she's cold from the air conditioning.  So I chose a ponte from JAF's Sew Classic line, thinking it would be good enough for a prototype, and then I'd spring for a nicer fabric for the real thing.  I was also originally thinking of purple, but I decided the final version would be purple, and the prototype would be green.  I went with size 16, because a fleece jacket I had made for her before (which fit well) was size 16.  Unfortunately, the previous jacket was from another pattern company, and I didn't think to check measurements.  Grrrr.....

Next problem: I decided to fully line the bodice instead of the partial lining, because I wanted the inside to look better and thought that would be easier.  And I decided to bind all the raw edges, kind of like a Hong Kong finish.  I thought that would make it look prettier on the inside.  Unfortunately, between my full bodice lining and my binding of the raw edges, I ran into construction issues that I hadn't thought about.  So the jacket pieces got wadded in a UFO tub before we moved.  Grrr...

The pieces came out of the tub, were considered, and thrown back into the tub several times over the last few years, until I finally pulled them out again a few weeks ago and decided to just finish the damn thing and get it over with.  I was determined that the jacket would be done for my aunt's birthday this year, come hell or high water.  So I sort of stumbled through the problems I'd caused by trying to make it fancier (next time, if there is one, I'll either wait and bind seams after they're sewn, or I'll put them together in a different order....have to think on that one) and finally got it done to the hems.  At this point, I realized that it looked kind of neat to have the binding on the raw hems.  So I asked advice from my sewing friends, and the consensus was that yes, it did look neat.  If I had it to do over, I would have put the collar wrong sides together and then just bound those edges as well, to make it look more cohesive.  But I'd already done it this way and didn't think it would go well to put binding over the stitched and turned edges.

In the end, I think I made it work, and the finished product looks pretty good!  Unfortunately, it is too small for my aunt.  Grrrr.....gotta find a friend who likes the style and can fit into it. :(


Sunday, September 29, 2013

New boy shirts

I think it's been fairly clear from previous posts that I really like the Fishsticks Designs Patrick Curved Raglan shirt pattern.  So when I thought that Thing 1 could use some new shirts, I pulled it out again.  The camo shirt was made from an interlock that an online sewing friend sent me - I thought that he would love it, because his greenish camo shirt (which is falling apart) is still worn frequently.  I used black ribbing from the stash for the neckband, and I sacrificed one of my shirts (don't worry, it had a few holes in it and was headed for the rag bag) for the sleeves.  This was a size 8, if I recall correctly.  I had originally added 2-3 inches in length to the body, but then I decided that it looked wrong in the proportions, so I cut it back down.

The lizard print is one I purchased from a coop a long time ago.  Then I used brown ribbing and interlock from my stash to finish it.  This is size 10, and I think it'll fit him for a good long time.  I even thought about making it long-sleeved, but I figured he'd really enjoy wearing it now.  The next ones will probably be long-sleeved, though - he doesn't have too many of those for winter.

I'm just glad to have these done!  My serger broke just after starting the lizard/brown shirt, and I had to wait until it was fixed, then realize that the stitch fingers were still off, try to order a new needle plate, wait for it to come and realize that the needle plate came WITHOUT stitch fingers (grrrr), realize again just how hard it is to get Necchi serger parts in the US, and finally get frustrated enough to order a new serger which should be MUCH easier to get replacement parts for.....and eventually unearth this project and decide to finish it.  Worth the wait, though!


Saturday, September 21, 2013

Back to pants?

I know, I said I was done with pants, but these aren't post-op pants.  These are a Christmas present, even though they were done at the same time as all the post-op pants.  And yes, I realize that the fabric is pretty crazy.  This is deep stash, originally purchased at WM, I believe.  And no, I have no idea what the original purpose was.  But it clearly didn't get done, so I appropriated them for PJ pants.  These are a trial run for the husband of a friend.  They'll double as his Christmas present, but the real intent is to find out how they fit for either Looney Tunes or Bears PJ pants next Christmas.  Gotta make these muslins in fabric you don't really care about, right?

I remember that my friend suggested not using flannel for his PJ pants, as he tends to get warm.  No flannel, check.  (But that does reduce my chances of finding semi-appropriate fabric in long enough pieces in the stash - hence the lobsters.)  And he wears a size M in his boxers, like my brother, so I figured that using my brother's size in PJ pants was a good start.  


Hopefully he'll be amused by the pants, and hopefully they'll fit well.  We'll see!

Wednesday, September 18, 2013

Boxers!

So apparently it's been awhile since I've sewn boxers, which is hard to believe, considering my past production....The last boxers I blogged about were in 2011, as Christmas gifts.  But I changed that recently!  My DH enjoys drinking beer and occasionally brewing his own, so when I saw this beer bottles fabric at the local quilt store, I just had to get it for him!  (I even paid full-price, so these are the most expensive boxers I've ever made!)  This was his Father's Day present.


And on a recent retail therapy trip (aided by a gift card, I might add!), I found licensed fabrics on 25% off sale.  My brother loves Star Wars and the color green, so I thought that this blueprints on green print would be awesome for some new boxers!  I think he'll really get a kick out of these for his birthday, and I'm really happy with how they turned out.


Sunday, September 15, 2013

2nd try at the fancy dress....

 So you may remember the previous adventure of the multi-fabric, non-matching dress, otherwise known as the Ava Knot Dress, Part I.  I had wanted to make a second dress for my niece, but this time in a combination that did not hurt my eyes.  And when I saw this green ladybug fabric at JAF, it jumped into my cart and declared that it needed to become an adorable little girl dress.  So off we went for coordinating red prints (note that I did not actually match the two red prints - in the spirit of "boutique" clothing) and called it good.  I decided to skip the apron, on the grounds that I bought the fabrics and can make this any way I want, and I didn't want the apron. :)  But I did see some cute ladybug ribbon on a later trip that I just had to buy for this dress.  It doesn't exactly match, but it's close enough, especially since it is not applied directly to the ladybug fabric.


This time I made the 24m size, in hopes that it will fit later.  (The dress was actually sent to them in August, so plenty of time to still wear it during the warm weather.  Plus it can be layered for more use.)

The instructions have you turn up the bottom hem 0.5 inches, then another 0.5 inches, and stitch.  The trim pieces are applied separately to the skirt pieces, and they are sewn together when the side seams are sewn.  I would rather stitch the trim pieces together, turn up and stitch the hem, and then stitch the trim to the skirt once the side seams are sewn.  And I prefer to do a one-inch hem by turning up 3/8 inch, then 5/8 inch, then stitch it in place at 0.5 inches.  In this case, because of applying the ribbon, I sewed the trim pieces together on one side, then turned up the hem as I described.  I then used my stitching line as a guide to pin and stitch down the ribbon, lining up the lower edge with the stitching line.  After I stitched that edge down, I then carefully stitched the upper edge.  (Then I realized I'd stitched it on upside down, and I had to unpick it all and start over.  But it was lined up great!)  Once I had the ribbon on, I sewed the other side of the trim together, matching the ribbon edges carefully, and then I stitched the trim onto the skirt.


This is a better picture of how the colors look in real life.  I really love how it turned out, and I hope that my sister-in-law loves it, too!  Hopefully I'll get a pic or two of my niece wearing it soon....

Thursday, September 12, 2013

The last of the pants!

These were the last of the post-op pants!  Hooray!  (They are definitely useful, but they were getting a bit boring by the end.)  There were no changes made to these from the last set.  The navy and grayish pants were from stash (deep stash, even!), so hooray for getting those out of the stash.  The dark brown and khaki were both from thrifted sheets.  

And I have to thank some of my online sewing buddies for sending me a few snaps so that I could finish these without waiting for a KamSnaps order to come in!  The navy, gray, and khaki pants all have snaps that came from friends who generously shared out of their stashes. ;)


At this point, Dad has two "fun" pair of pants for around the house, plus eight pair of work-appropriate pants.  (And the original hunter green test pair - hopefully Mom shortened those so that they are also in the mix.)  I think that's enough for quite some time.

Wednesday, September 4, 2013

And still more pants!

Another installment of post-op pants!  This is the last pair of "fun" pants - as in, not to be worn outside the house.  I found this set of plaid sheets at the thrift store, and I just thought they'd be hilarious as pants, especially since my dad is really not a plaid pants kind of guy.  They're not very substantial, so good for the warmer weather (when I made/sent these), and they have a silky feel to them, so definitely not work wear.  But they were fun.  And I'm in awe of how the plaids matched up!  I added red snaps and a red drawstring to play up the thin red lines in the plaid.


And I put the pocket and flap on the bias, so that I wouldn't have to deal with trying to match it at all.  The fabric isn't terribly stable, so I fully interfaced both the pocket and the flap, and then I also self-lined the pocket (though not on the bias).  It seemed to work out pretty well.


And now for some more work pants.  I was told that my dad wouldn't be able to tolerate regular pants for quite some time, but he could wear my creations to work.  So these are solid colors.  The brown (which is actually darker in real life) and the black pairs are thrifted sheets, and the blue (more of a navy) is long-time stash.  I'm thrilled to have found a use for it!  These all have faux flys, drawstrings, and two cargo pockets.  I have another four pair of solid pants in the works, and then we'll call it good....


Sunday, September 1, 2013

More post-op pants

So the protoype pants came back as perfect but 5 inches too long.....Well, that's an easy fix!  So here are the first installment:


The national parks fabric has been in my stash for a long time....as in, I don't even know how long.  I believe it was a WM purchase, at $1/yd.  At any rate, I was happy to get some of it off the shelves!  Then the mossy green pair was from a thrifted sheet.  As per request, I continued the drawstrings, but went to a faux fly instead of a functional one.  (Works for me - that cuts out a few steps.)  And I did two pockets on the solid pants instead of one.  (The print pants will not be worn to work, so they only needed one pocket.)

Instead of trying to match the print for the pocket - an impossible task, I'm thinking! - I used some leftover brown broadcloth for the pocket and flap, and I appliqued one of the pictures onto the pocket.  I think they turned out pretty well!


Thursday, August 29, 2013

Mother-daughter sewing....

My sister-in-law had a birthday this summer, and after totally striking out on ideas for her, I finally just flat-out asked what she wanted. :)  She sent me a few links of clothing patterns she was interested in, and from those, I went with the Frog Legs and Ponytails patterns Amelia Shirt for her and Caroline Dress for my niece.  She wanted to do some mother-daughter dressing, so with these, I chose to make them identical.  (In the future, I may switch the main fabric/trim to make them close but different.)  I consulted with my brother while in the fabric store, texting him pictures of different combinations, and we went with the purple and yellow sundrenched dragonflies (JAF).  

This is the Amelia Shirt for my sister-in-law, and IIRC, I went with a size M.  This was a total guess, as I didn't know her measurements.  Fortunately, she let me know that it was a pretty good guess. :)  


And the Caroline Dress for my niece.  She was about 18 months at the time, so I went with the 12-24 month size.  As you can see, the main difference in appearance between the two patterns is the length of the contrast band.


These are both basically pillowcase dresses/shirts, and there are plenty of versions out there, as well as free patterns/tutorials online.  However, I appreciated having the full range of sizes available to me, so that I didn't have to do much guessing or reinvent the wheel.  If I had been making this for myself or someone who lived in my house, I would probably not have purchased the patterns.  But for working long-distance, it was much better to go with patterns.  And that said, I thought that the patterns were well-drafted and thoroughly written, without being too detailed.  I like the professional pictures, as well.  And I appreciated that the designer gave cutting measurements instead of actual patterns for the squares and rectangles, since I prefer to use my rulers and rotary cutter.  For those who prefer actual patterns and scissors, this may not be a good pattern for you.

I'm just thrilled that my sister-in-law loved the results, and I have more fabrics to make another set.  This time, since we're starting to head into fall, I may go up a size for my niece's dress, so that hopefully she can still wear it next year.

Monday, August 26, 2013

More dinosaur appliques!

An online friend had seen my previous dinosaur applique projects, and she commissioned me to make some dino onesies and matching burp cloths for a new mom in our sewing group.  She provided the cloth diapers and the fabrics, and I did the work.  I love her fabric choices!  These are the burp cloths with dino prints onesies with batiks that go with them.


And then a closer view of the dinosaurs.  I love how they look with these batiks!  I didn't really fussy cut them - not easy to do when you're working from the back of the fabric.  But some of these are adorable with how they turned out!


And then, since I've been having so much fun with these dinos, I volunteered to make two sets to send off as door prizes in a clinic celebration in honor of World Breastfeeding Day.  These fabrics are all scraps from my stash.  I think they made great dinosaurs!


Appliqued onesies are quickly going to become my baby gift of choice....

Friday, August 23, 2013

Sewing for post-op care

My dad was having prostate surgery in mid-July, and my mom suggested that elastic waist pants would be a good thing for him to wear during the recovery period.  So I used my trusty men's PJ pants pattern (B6887, which is sadly OOP) to make a test pair.  These pants are a straight size L, as my brother wears a M in both his boxers (S9958) and PJ pants (B6887), and my dad wears a L in his boxers (S9958).  I knew they'd be long on him - he's shorter than my brother - but I didn't know how much length to take out, and whether to take it out of crotch, legs, or both.  I made a functional fly with the instructions from S9958, in case it would be helpful with the post-op catheter, and I added a single cargo pocket, much like my scrub pants.  Then I sent it off with a list of fit/preference questions. :)


While waiting for answers to the questions so that I could make a bunch more, I got the suggestion that shorts might actually be better.  So I made several pairs of shorts.  These are all different patterns, as I didn't know which might work better.  The lime green (the color didn't show up quite right in the picture) shorts are from B6887, and they have no pockets.  The green striped shorts are S8088, a discontinued scrubs pattern that I had in my stash.  They are size L also, and they come with inseam pockets.  The black pair is S5539, which I used to have in my stash but apparently lost/binned/something.  I had to repurchase it on etsy, much to my chagrin. That is also size L, with the mid-length (there are 3 length options), and with inseam pockets.  I made all three with functional flys, closed with 2 small snaps, and added drawstrings.  Then I sent these off with the same fit/preference questions.


Tuesday, August 20, 2013

Party gift bags

So my monkeys have summer birthdays, and we have pool parties for said birthdays.  After all, why pay for a fancy party venue, when there's a pool in the backyard, right?  Anyway, as I blogged about last year, I prefer to have "green" party bags.  So this year I thought that drawstring bags would be good, and I wanted to make them a little more "themed" to the pool, especially since the goodies inside were all pool-related.  So I found a swimming clip art image and enlarged it to a good size for the bags.  I used heat-n-bond lite to fuse the appliques in place, then straight-stitched just inside the edges with matching thread.  The green bags were for Thing 1's party (his favorite color is green), and the orange ones for Thing 2's party.  The green and black fabrics were thrifted sheets - the green is actually more of a lime color - and the orange was broadcloth that I purchased on sale at JAF.  The green bags are lined with black, but the orange bags are lined with the orange.  The bags ended up measuring about 11 inches wide by 13.5 inches tall - a good size for fun pool toys, as well as whatever treasures they will hold later.


I hope that the kids enjoy using them to hold their stuff as much as I enjoyed making them!

Tuesday, August 6, 2013

Another Angry Bird knockoff

Back in February, I blogged about making this view of M6481, I mentioned that I gave one to a friend's son as a birthday gift, and his brother became super jealous.  Well, said brother has now had his own birthday, and I thought it would be nice to make him his own Angry Bird knockoff.  This time, I used a fuzzy red fleece instead of green, and I've shown all three birds that can be made from the 1/4 yard of fabric required. :)  Once again, I used a press cloth and fused the eyes (from felt) in place without detrimentally affecting the fleece, but this time I did stitch them in place, as well.  Not only is it more secure, but I have to say that I like the look better.


Now my boys want the two leftover birds!  Oops!  I'll have to hide them in the gift closet....

Monday, July 8, 2013

End of the year teacher gifts!

I can't believe that I never blogged about my end of the year teacher gifts before now!  I was really excited about them, and the teachers seemed to enjoy them, too!  I got the idea of a summer relaxation tote from The Lovely Cupboard via Craft, Interrupted.  I sewed my tote bags, of course. :)  These are two layers of Symphony Broadcloth from JAF - I figured that would be lightweight but sturdy and easy to wash, so perfect for the pool, beach, wherever.  The pink tote is for Thing 1's classroom teacher - I knew her favorite color, so that was an easy pick.  I didn't know favorites for the other two, so I used the Things' favorite colors.  Thing 1's gifted teacher got green (with blue, because it just looked great that way!).  I had choices other than lime, but I thought that would be very summery.  Thing 2's teacher got orange, and since I'm an Illini, it had to be a blue contrast!


I adapted the suggestions from the blog posting and put in a beach towel (from WM, chosen to match the tote colors), plastic tumbler (WM), a pair of flip-flops (K-Mart), spray sunscreen (WM), jar of strawberry lemonade mix, and Barnes & Noble gift card.  And I had the Things make thank-you cards for their teachers, with Summer Subway Art on the front of the card.  I was super excited to see that I could print colorways that went with the tote bags.  In the end, these went over really well, and I even made another for a friend who needed a cheery package in the mail. :)

Thursday, July 4, 2013

More applique

So when I made the previous dinosaur-appliqued onesies, I thought to myself that my niece really needed a set, too!  So I got a set of 18 month Child of Mine onesies and enlarged my dino appliques a bit.  I really like how these turned out!  There's just something about dinosaur shapes in girl colors that is unexpected and really fun, I think.


And then I decided that my niece also needed some girly Star Wars shirts (since my brother is, in fact, the world's biggest Star Wars fanatic).  So I got 18 (white) and 24 (pink) month Garanimals shirts (WM) and appliqued a Tie fighter and an X-wing fighter on them, using leftovers of the dress fabrics. I think these turned out pretty awesome, too!  :)


Monday, July 1, 2013

A baby dress!

My sister-in-law sent me a link to a baby/toddler dress probably a year ago and asked if I thought I could make something like that.  I said, sure, probably, let me look for some patterns I can Franken-pattern together to get it.  Then a few months later, I saw The Ava Knot Dress pattern by Pink Poodle Bows.  It was almost exactly like the dress she had wanted!  So I downloaded the pattern, but since I am multi-fabric-matching-impaired, I gave her the yardage requirements and told her to buy the fabric she wanted and send it to me.  Here is the result:


Not anything I would ever have put together, but it was what my SIL wanted, and she is thrilled.  When I made this, my niece was about 16 months old, and I used the 18 month size.  The feedback I got is that it fits her perfectly right now, but the bodice will likely be too small in the fall.  So next dress will be 24 month size, I think.

This was a fairly quick sew.  There are no pattern "pieces" - just cutting measurements.  (There is a template to cut the armholes out of the bodice pieces.)  Everything fit together perfectly, and the instructions were easy to read and follow.  I did get confused on one spot, but that's only because I misread the directions.  I emailed the designer for clarification and was surprised to get an email back within an hour!

Like I said, my SIL was thrilled with the dress, so I will definitely make more.  (The next version is one that I bought fabric for, so it will be more sedate.)  I've told her already that I'm happy to make whatever she wants - but she needs to get the fabric, because this multi-fabric-matching is not my style. :)

Friday, June 28, 2013

Easy table runners

So apparently I've never blogged about it before, but I've made a couple of cute table runners in the past.  Nothing fancy, just two complimentary fabrics and the 10-minute table runner pattern.  (Which, by the way, has never taken me only ten minutes!  I'm too OCD about the pressing parts - but it is really quick.)

Anyway, I've previously used the pattern and liked it, and I got the brilliant idea that several people on my gifting list could use a "Table Runner of the Month" club.  Aka, at every birthday and Christmas, give them a few table runners to go with monthly themes or holidays.  So when I find appropriate fabric for each holiday or monthly theme, I'm snapping it up for some assembly-line table runner sewing....

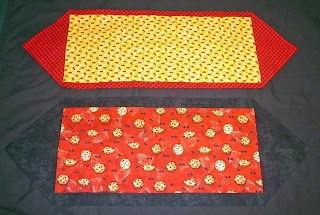
I was not originally intending to do any specific birthday runners, but I thought this fabric was too bright and cheery to pass up!  I found it at JAF in the novelty section and immediately bought enough for 4 runners - one for me, three for gifts - plus some extra for birthday hanging towels.  The blue and purple solids are one of the quilter's solids from JAF, and they have a habit of wrinkling more than I like.  But I couldn't get those colors from Kona cotton, at least not at JAF, so it was worth it.  The yellow is a Kona cotton, and a much better quality fabric.  


The green of the birthday runner is a Kona cotton, also - very nice.  The patriotic fabrics are both from HF and were an impulse buy back in February.  They weren't even on sale!  But I really liked them and decided they were worth it.


If I remember right, the ladybugs (top runner) and chocolate chips were the inspiration for the "table runner of the month" idea.  Neither of these are really for any specific month - I just thought they would make good table runners.  My mom loves bright yellow and cheery prints, so the ladybugs were a no-brainer.  And who wouldn't want chocolate chip cookies on their table?


The vintage-look Valentine fabric was a lucky find.  I like a lot of the more cutesy Valentine's prints, but not for leaving on your table all month.  I wanted something that was a little more restrained, a little less sappy, a little more grown-up.  This fit the bill!


I have plenty more themes planned and some of the fabrics purchased.

Monday, May 20, 2013

Playing Catch-up

We've had two recent girl birthday parties that either one or all of us were invited to.  I thought that girly PJ eaters were in order for both occasions, and so I cut out two nearly identical ones.  (The zipper color was the only difference.)  I'm really pleased with this one and think it's one of the cutest I've made so far!  (And I'm amused that for the birthday party which we attended as a family, I finished the PJ eater in the car - stuffing and stitching shut.  Yep, procrastination pays....)  I'm definitely keeping track of who gets PJ eaters now - this are great birthday gifts, but I've got to make sure I don't accidentally give two to the same kid!


And Thing 2 was in love with the dinosaur appliques I made as a baby gift, so I had to make him his own dinosaur appliqued shirt - with more boyish colors, of course! :)  He loves orange, so I thought this batik-like print was perfect for him.  I enlarged the dino drawing until it looked vaguely appropriate (nothing scientific - just eyeballing), then traced it onto Heat-n-Bond Lite and fused it in place.  This is another which has been stitched on with straight-stitching around the edges, and I don't remember putting any Fray-Check on it.  But I've had to wash it four or five times by now, and so far, no fraying is noticeable.  This has already become a favorite!  I can see that I'll have to watch for other fun applique designs!


Friday, May 17, 2013

Teacher birthday/appreciation gift

We have really appreciated Thing 1's teacher this year, so I wanted to give her something for her birthday that would be useful but fun.  Teachers can always use tote bags for their stuff, so I thought that would be a good idea.  And I already knew (from Thing 1) that she loves pink and shoes, among other things.  When I saw the high heels fabric on the Nancy's Notions website, it was a no-brainer!  I used a pink duck cloth from JAF as the outer fabric.

I ordered 1.5 yards, because I didn't figure out exactly what I was going to do before ordering.  Later, I saw the Green Pepper Wave Bag pattern at JAF and bought it, thinking that might be the way to go. However, after mostly finishing the prototype (it's still languishing while I re-evaluate how I want to do the upper trim/handles), I decided that it wasn't going to be what I wanted for the teacher, and I went with a simple and basic tote bag design.  

I measured a good-sized tote bag we had on hand and approximated those measurements for my bag.  That one had an almost full-size pocket on the outside, which I considered using here.  In the end, I couldn't figure out how to do the handles and the upper trim the way I wanted if I put the large pocket on the outside, so instead I added it to the inside.  I did put a small pocket on the outside, sandwiched between the handles.  To make the trim on the upper edge of that pocket, I stitched the outer and lining fabrics RST, then wrapped the lining fabric to the inside - OVER the seam allowance.  This gave me a half inch (IIRC) trim at the upper edge of the pocket.  For the trim at the top of the bag, I cut the lining 1.5 inches taller than the outer fabric, then folded and pressed the lining 0.5 inches under (to hide raw edges), then another 1 inch under.  When I set the lining inside the bag, I tucked the outer fabric into that last fold, pinned it in place, and stitched it down.  I'm really happy with how this turned out.  You can also see that the lining is peeking out on the underside of the handles.  That was the suggestion of a neighbor!  The handles are tubes of duck cloth, pressed flat and edge-stitched on both sides.  I made single-fold "bias" tape to cover the underside of the handles, just for the parts that show (and extending an inch or two past, just in case).

This shows the inside.  If you look at the bottom, you can see a "bellows" pocket to the left (which I'm not entirely happy with - I think I made it a bit big) and a small flat pocket to the right.  You can also see the edge of the large pocket at the top left - that was made from one layer each of lining fabric and duck cloth.  I was thinking that it would be good for separating out papers or something.


I really like how this bag turned out, and I'm going to use the same idea again - hopefully soon for our long-intended library books.  I hope that the teacher really liked it.

Tuesday, May 14, 2013

Easy drawstring bags

I've been working on some easy drawstring bags lately.  I've done large versions of these before, with vinyl windows, as a way to contain toys.  These were the same idea, but without the window, making them pretty quick and simple.

This was inspired by Thing 1's invitation to a birthday party involving a Pokemon tournament.  I thought it would be good for him to have a pouch of sorts to hold his cards, so that he didn't have to take them in a ziploc bag.  I had Pokemon fabric leftover from his lunch bag, so I pulled it out and used it to make a simple bag.  (IIRC, I cut the pieces 9 inches tall by 7 inches wide.)  This is lined with white muslin or broadcloth - I don't remember which I had on hand - and then a casing was made from extra wide, double fold bias tape (unfolded), and a drawstring from single-fold bias tape (folded in half and stitched).  This works great as long as the kid doesn't have a huge collection of cards.  (Full disclosure - this had plenty of room until Thing 1 came home from the party with double the number of cards he had taken.  So now I've made him another one (no picture yet) with boxed corners and plenty more room!)  This is actually the second one I made - as a gift for one of Thing 2's friends.  The casing/drawstring color was customized to the child's favorites.  Add a pack or two of cards, and your gift is done!


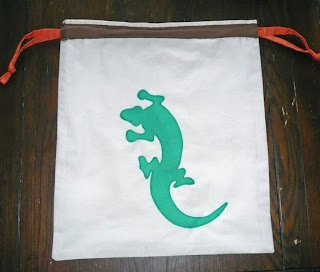
For the Pokemon party Thing 1 was invited to, the birthday boy requested no gifts for himself - instead he wanted donations for the Boy Scouts' April Showers campaign.  I thought that was really neat, but I also wanted him to have something he could keep.  However, I wanted to honor the request and so make his "keepable part" very simple and useful.  I thought that a simple drawstring bag would serve as the gift bag and then be kept for whatever he wanted to store in it.  And since this child LOVES animals - especially snakes and lizards - I thought that some simple appliques would make it more fun.  I went to Google Images and found some coloring pictures of lizards and geckos and those two that I thought would be easy enough to applique.  A little Heat-n-Bond Lite and some straight-stitching around the edges, and voila!


I'm going to remember this for the future - muslin or thrifted sheets for the bag, to keep it low-cost and lightweight, and a simple applique or two to snazz it up a bit.  For this one, I think I had made my own bias tape for the casing, but used premade for the drawstring.  Oh, and when I make single-fold tape for the casing or double-fold tape for the drawstring, I often cut it on the straight grain, because it doesn't need that bias stretch.  Just whatever is quicker/easier.